TableLayout
Контейнер TableLayout структурирует элементы управления в виде таблицы по столбцам и строкам. Определим в файле activity_main.xml элемент TableLayout, который будет включать две строки и два столбца:
<TableLayout xmlns:android="http://schemas.android.com/apk/res/android"
    android:layout_width="match_parent"
    android:layout_height="match_parent">
    <TableRow>
        <TextView
            android:layout_weight="0.5"
            android:text="Логин"
            android:layout_width="wrap_content"
            android:layout_height="wrap_content" />

        <EditText
            android:layout_weight="1"
            android:layout_width="match_parent"
            android:layout_height="wrap_content"  />
    </TableRow>

    <TableRow>
        <TextView
            android:layout_weight="0.5"
            android:text="Email"
            android:layout_width="wrap_content"
            android:layout_height="wrap_content" />

        <EditText
            android:layout_weight="1"
            android:layout_width="wrap_content"
            android:layout_height="wrap_content" />
    </TableRow>
</TableLayout>
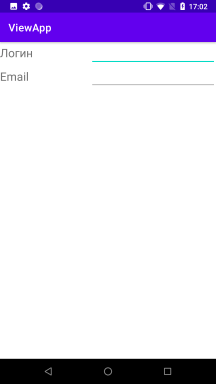
Используя элемент TableRow, мы создаем отдельную строку. Как разметка узнает сколько столбцов надо создать? Android находит строку с максимальным количеством виджетов одного уровня, и это количество будет означать количество столбцов. Например, в данном случае у нас определены две строки и в каждой по два элемента. Если бы в какой-нибудь из них было бы три виджета, то соответственно столбцов было бы также три, даже если в другой строке осталось бы два виджета.
Причем элемент TableRow наследуется от класса LinearLayout, поэтому мы можем к нему применять тот же функционал, что и к LinearLayout. В частности,
для определения пространства для элементов в строке используется атрибут android:layout_weight.
Если какой-то элемент должен быть растянут на ряд столбцов, то мы можем растянуть его с помощью атрибута layout_span, который указывает на какое количество столбцов надо растянуть элемент:
<TableLayout xmlns:android="http://schemas.android.com/apk/res/android"
    android:layout_width="match_parent"
    android:layout_height="match_parent">
    <TableRow>
        <TextView
            android:textSize="22sp"
            android:text="Логин"
            android:layout_width="100dp"
            android:layout_height="wrap_content" />

        <EditText
            android:textSize="22sp"
            android:layout_width="200dp"
            android:layout_height="wrap_content"  />
    </TableRow>

    <TableRow>
        <TextView
            android:textSize="22sp"
            android:text="Email"
            android:layout_width="wrap_content"
            android:layout_height="wrap_content" />

        <EditText
            android:textSize="22sp"
            android:layout_width="wrap_content"
            android:layout_height="wrap_content" />
    </TableRow>
    <TableRow>
        <Button
            android:text="Отправить"
            android:layout_width="wrap_content"
            android:layout_height="wrap_content"
            android:layout_span="2"/>
    </TableRow>
</TableLayout>
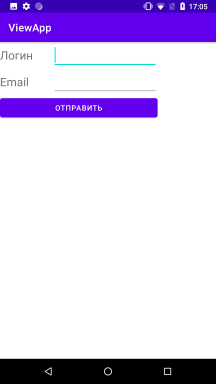
Также можно растянуть элемент на всю строку, установив у него атрибут android:layout_weight="1":
<TableRow>
    <Button
        android:text="Отправить"
        android:layout_width="match_parent"
        android:layout_height="wrap_content"
        android:layout_weight="1" />
</TableRow>
Программное создание TableLayout
Создадим TableLayout программным образом, переложив на код java самый первый пример из данной статьи:
package com.example.viewapp;

import androidx.appcompat.app.AppCompatActivity;
import android.os.Bundle;
import android.widget.EditText;
import android.widget.TableLayout;
import android.widget.TableRow;
import android.widget.TextView;

public class MainActivity extends AppCompatActivity {

    @Override
    protected void onCreate(Bundle savedInstanceState) {
        super.onCreate(savedInstanceState);

        TableLayout tableLayout = new TableLayout( this);

        // первая строка
        TableRow tableRow1 = new TableRow(this);

        TextView textView1 = new TextView(this);
        textView1.setText("Логин");
        tableRow1.addView(textView1, new TableRow.LayoutParams(
                TableRow.LayoutParams.WRAP_CONTENT, TableRow.LayoutParams.WRAP_CONTENT, 0.5f));

        EditText editText1 = new EditText(this);
        tableRow1.addView(editText1, new TableRow.LayoutParams(
                TableRow.LayoutParams.WRAP_CONTENT, TableRow.LayoutParams.WRAP_CONTENT, 1.0f));

        // вторая строка
        TableRow tableRow2 = new TableRow(this);

        TextView textView2 = new TextView(this);
        textView2.setText("Email");
        tableRow2.addView(textView2, new TableRow.LayoutParams(
                TableRow.LayoutParams.WRAP_CONTENT, TableRow.LayoutParams.WRAP_CONTENT, 0.5f));

        EditText editText2 = new EditText(this);
        tableRow2.addView(editText2, new TableRow.LayoutParams(
                TableRow.LayoutParams.WRAP_CONTENT, TableRow.LayoutParams.WRAP_CONTENT, 1.f));

        tableLayout.addView(tableRow1);
        tableLayout.addView(tableRow2);
        setContentView(tableLayout);
    }
}
- Глава 1. Начало работы с Android
- Глава 2. Основы создания интерфейса
- Создание интерфейса в коде java
- Определение интерфейса в файле XML. Файлы layout
- Определение размеров
- Ширина и высота элементов
- Внутренние и внешние отступы
- ConstraintLayout
- Размеры элементов в ConstraintLayout
- Цепочки элементов в ConstraintLayout
- Программное создание ConstraintLayout и позиционионирование
- LinearLayout
- RelativeLayout
- TableLayout
- FrameLayout
- GridLayout
- ScrollView
- Вложенные layout
- Gravity и позиционирование внутри элемента
- Глава 3. Основные элементы управления
- Глава 4. Ресурсы
- Глава 5. Activity
- Глава 6. Работа с изображениями
- Глава 7. Адаптеры и списки
- ListView и ArrayAdapter
- Ресурс string-array и ListView
- Выбор элемента в ListView
- Добавление и удаление в ArrayAdapter и ListView
- Расширение списков и создание адаптера
- Оптимизация адаптера и View Holder
- Сложный список с кнопками
- Выпадающий список Spinner
- Виджет автодополнения AutoCompleteTextView
- GridView
- RecyclerView
- Обработка выбора элемента в RecyclerView
- Глава 8. Стили и темы
- Глава 9. Меню
- Глава 10. Фрагменты
- Глава 11. Многопоточность
- Глава 12. Работа с сетью. WebView
- Глава 13. Работа с мультимедиа
- Глава 14. Настройки и состояние приложения
- Глава 15. Работа с файловой системой
- Глава 16. Работа с базами данных SQLite
- Глава 17. Перелистывание страниц и ViewPager2
- Глава 18. Сервисы
- Глава 19. Диалоговые окна
- Глава 20. Анимация
- Глава 21. Провайдеры контента
- Глава 22. JSON
- Глава 23. Работа с XML