Цепочки элементов в ConstraintLayout
ConstraintLayout позволяет организовать расположение элементов в ряд по горизонтали или по вертикали или то, что в Android называется chains или цепочки. Мы можем по цепочке установить позиционирование одного элемента относительно другого и таким обазом организовать ряд элементов.
Горизонтальная цепочка элементов
Например, ряд элементов по горизонтали:
<?xml version="1.0" encoding="utf-8"?>
<androidx.constraintlayout.widget.ConstraintLayout
	xmlns:android="http://schemas.android.com/apk/res/android"
    xmlns:app="http://schemas.android.com/apk/res-auto"
    xmlns:tools="http://schemas.android.com/tools"
    android:layout_width="match_parent"
    android:layout_height="match_parent"
    tools:context=".MainActivity">

    <TextView
        android:id="@+id/textView1"
        android:layout_width="wrap_content"
        android:layout_height="wrap_content"
        android:background="#efefef"
        android:text="First"
        android:textSize="30sp"
        app:layout_constraintRight_toLeftOf="@id/textView2"
        app:layout_constraintLeft_toLeftOf="parent"
        app:layout_constraintTop_toTopOf="parent" />

    <TextView
        android:id="@+id/textView2"
        android:layout_width="wrap_content"
        android:layout_height="wrap_content"
        android:background="#e0e0e0"
        android:text="Second"
        android:textSize="30sp"
        app:layout_constraintLeft_toRightOf="@id/textView1"
        app:layout_constraintRight_toLeftOf="@id/textView3"
        app:layout_constraintTop_toTopOf="parent" />

    <TextView
        android:id="@+id/textView3"
        android:layout_width="wrap_content"
        android:layout_height="wrap_content"
        android:background="#efefef"
        android:text="Third"
        android:textSize="30sp"
        app:layout_constraintLeft_toRightOf="@id/textView2"
        app:layout_constraintRight_toRightOf="parent"
        app:layout_constraintTop_toTopOf="parent" />

</androidx.constraintlayout.widget.ConstraintLayout>
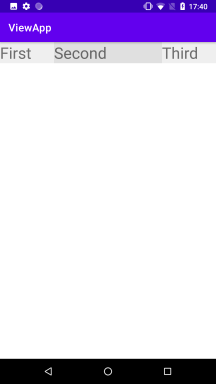
В итоге элементы цепочки равномерно будут растянуты по всей ширине контейнера:
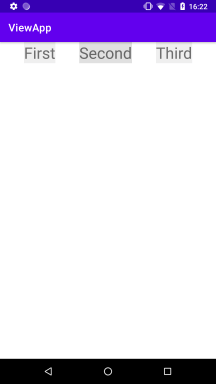
Горизонтальная цепочка элементов достигается за счет двух факторов:
Первый элемент выравнивается относительно левой границы контейнера (
app:layout_constraintLeft_toLeftOf="parent"), последний элемент выравнивается относительно правой границы контейнера (app:layout_constraintRight_toRightOf="parent").Благодаря установке атрибутов
app:layout_constraintLeft_toRightOfиapp:layout_constraintRight_toLeftOfрасполагаем один элемент справа или слева от другого.
Кроме того, ConstraintLayout позволяет настроить положение элементов внутри цепочки. Для этого применяется атрибут layout_constraintHorizontal_chainStyle, который может принимать следующие значения:
spread: значение по умолчанию, при котором элементы цепочки равномерно растягиваются по всей длине цепочки, как в примере выше
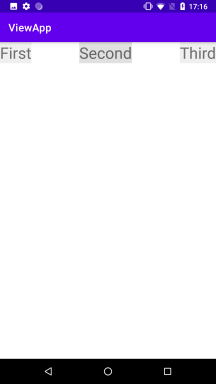
spread_inside: первый и последний элемент цепочки примыкают к границами контейнера
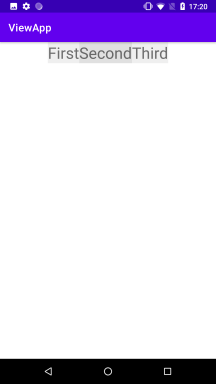
packed: элементы цепочки располагаются вплотную друг к другу.
Например, применим значение spread_inside:
<?xml version="1.0" encoding="utf-8"?>
<androidx.constraintlayout.widget.ConstraintLayout xmlns:android="http://schemas.android.com/apk/res/android"
    xmlns:app="http://schemas.android.com/apk/res-auto"
    xmlns:tools="http://schemas.android.com/tools"
    android:layout_width="match_parent"
    android:layout_height="match_parent"
    tools:context=".MainActivity">

    <TextView
        android:id="@+id/textView1"
        android:layout_width="wrap_content"
        android:layout_height="wrap_content"
        android:background="#efefef"
        android:text="First"
        android:textSize="30sp"

        app:layout_constraintHorizontal_chainStyle="spread_inside"

        app:layout_constraintRight_toLeftOf="@id/textView2"
        app:layout_constraintLeft_toLeftOf="parent"
        app:layout_constraintTop_toTopOf="parent" />

    <TextView
        android:id="@+id/textView2"
        android:layout_width="wrap_content"
        android:layout_height="wrap_content"
        android:background="#e0e0e0"
        android:text="Second"
        android:textSize="30sp"
        app:layout_constraintLeft_toRightOf="@id/textView1"
        app:layout_constraintRight_toLeftOf="@id/textView3"
        app:layout_constraintTop_toTopOf="parent" />

    <TextView
        android:id="@+id/textView3"
        android:layout_width="wrap_content"
        android:layout_height="wrap_content"
        android:background="#efefef"
        android:text="Third"
        android:textSize="30sp"
        app:layout_constraintLeft_toRightOf="@id/textView2"
        app:layout_constraintRight_toRightOf="parent"
        app:layout_constraintTop_toTopOf="parent" />

</androidx.constraintlayout.widget.ConstraintLayout>
Причем в данном случае достаточно установить атрибут у первого элемента цепочки:
Значение packed:
<?xml version="1.0" encoding="utf-8"?>
<androidx.constraintlayout.widget.ConstraintLayout xmlns:android="http://schemas.android.com/apk/res/android"
    xmlns:app="http://schemas.android.com/apk/res-auto"
    xmlns:tools="http://schemas.android.com/tools"
    android:layout_width="match_parent"
    android:layout_height="match_parent"
    tools:context=".MainActivity">

    <TextView
        android:id="@+id/textView1"
        android:layout_width="wrap_content"
        android:layout_height="wrap_content"
        android:background="#efefef"
        android:text="First"
        android:textSize="30sp"

        app:layout_constraintHorizontal_chainStyle="packed"

        app:layout_constraintRight_toLeftOf="@id/textView2"
        app:layout_constraintLeft_toLeftOf="parent"
        app:layout_constraintTop_toTopOf="parent" />

    <TextView
        android:id="@+id/textView2"
        android:layout_width="wrap_content"
        android:layout_height="wrap_content"
        android:background="#e0e0e0"
        android:text="Second"
        android:textSize="30sp"
        app:layout_constraintLeft_toRightOf="@id/textView1"
        app:layout_constraintRight_toLeftOf="@id/textView3"
        app:layout_constraintTop_toTopOf="parent" />

    <TextView
        android:id="@+id/textView3"
        android:layout_width="wrap_content"
        android:layout_height="wrap_content"
        android:background="#efefef"
        android:text="Third"
        android:textSize="30sp"
        app:layout_constraintLeft_toRightOf="@id/textView2"
        app:layout_constraintRight_toRightOf="parent"
        app:layout_constraintTop_toTopOf="parent" />

</androidx.constraintlayout.widget.ConstraintLayout>
Вес элемента
Стоит отметить, что выше у элементов устанавливалась ширина, необходимая для их содержимого. Но мы могли бы установить и нулевую ширину, тогда элементы равномерно бы распределялись по всей цепочки без образования промежутков между ними.
<?xml version="1.0" encoding="utf-8"?>
<androidx.constraintlayout.widget.ConstraintLayout xmlns:android="http://schemas.android.com/apk/res/android"
    xmlns:app="http://schemas.android.com/apk/res-auto"
    xmlns:tools="http://schemas.android.com/tools"
    android:layout_width="match_parent"
    android:layout_height="match_parent"
    tools:context=".MainActivity">

    <TextView
        android:id="@+id/textView1"
        android:layout_width="0dp"
        android:layout_height="wrap_content"
        android:background="#efefef"
        android:text="First"
        android:textSize="30sp"
        app:layout_constraintRight_toLeftOf="@id/textView2"
        app:layout_constraintLeft_toLeftOf="parent"
        app:layout_constraintTop_toTopOf="parent" />

    <TextView
        android:id="@+id/textView2"
        android:layout_width="0dp"
        android:layout_height="wrap_content"
        android:background="#e0e0e0"
        android:text="Second"
        android:textSize="30sp"
        app:layout_constraintLeft_toRightOf="@id/textView1"
        app:layout_constraintRight_toLeftOf="@id/textView3"
        app:layout_constraintTop_toTopOf="parent" />

    <TextView
        android:id="@+id/textView3"
        android:layout_width="0dp"
        android:layout_height="wrap_content"
        android:background="#efefef"
        android:text="Third"
        android:textSize="30sp"
        app:layout_constraintLeft_toRightOf="@id/textView2"
        app:layout_constraintRight_toRightOf="parent"
        app:layout_constraintTop_toTopOf="parent" />

</androidx.constraintlayout.widget.ConstraintLayout>
В этом случае значение атрибута app:layout_constraintHorizontal_chainStyle не играет никакой роли, так как все элементы итак растягиваются по всей цепочке.
Однако такое поведение может не устраивать, например, мы хотим, чтобы один элемент был два раза больше другого. И в этом случае мы можем с помощью атрибута layout_constraintHorizontal_weight. Однако следует учитывать, что при применении весов у элементов, они должны иметь нулевую ширину:
<?xml version="1.0" encoding="utf-8"?>
<androidx.constraintlayout.widget.ConstraintLayout xmlns:android="http://schemas.android.com/apk/res/android"
    xmlns:app="http://schemas.android.com/apk/res-auto"
    xmlns:tools="http://schemas.android.com/tools"
    android:layout_width="match_parent"
    android:layout_height="match_parent"
    tools:context=".MainActivity">

    <TextView
        android:id="@+id/textView1"
        android:layout_width="0dp"
        android:layout_height="wrap_content"
        android:background="#efefef"
        android:text="First"
        android:textSize="30sp"

        app:layout_constraintHorizontal_weight="1"

        app:layout_constraintRight_toLeftOf="@id/textView2"
        app:layout_constraintLeft_toLeftOf="parent"
        app:layout_constraintTop_toTopOf="parent" />

    <TextView
        android:id="@+id/textView2"
        android:layout_width="0dp"
        android:layout_height="wrap_content"
        android:background="#e0e0e0"
        android:text="Second"
        android:textSize="30sp"

        app:layout_constraintHorizontal_weight="2"

        app:layout_constraintLeft_toRightOf="@id/textView1"
        app:layout_constraintRight_toLeftOf="@id/textView3"
        app:layout_constraintTop_toTopOf="parent" />

    <TextView
        android:id="@+id/textView3"
        android:layout_width="0dp"
        android:layout_height="wrap_content"
        android:background="#efefef"
        android:text="Third"
        android:textSize="30sp"

        app:layout_constraintHorizontal_weight="1"

        app:layout_constraintLeft_toRightOf="@id/textView2"
        app:layout_constraintRight_toRightOf="parent"
        app:layout_constraintTop_toTopOf="parent" />

</androidx.constraintlayout.widget.ConstraintLayout>
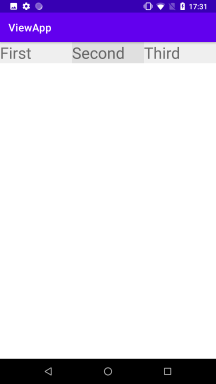
В качестве значения атрибут layout_constraintHorizontal_weight принимает число - вес элемента. Так, в данном случае вес первого элемента - 1, вес второго - 2,
а вес третьего - 1. Поэтому вся ширина контейнера будет условно поделена на 1 + 2 + 1 = 4 частей, из которых по одной части займут первый и третий элемент,
а второй займет 2 части, то есть второй элемент будет в два раза больше первого и третьего элемента.
В принципе мы можем оставить элементы и с шириной "wrap_content" или конкретным значением, отличным от "0dp", просто в этом случае они не будут участвовать в распределении пространства контейнера и вес у такого элемента роли играть не будет.
Вертикальная цепочка
Для образования вертикальной цепочки также должно соблюдаться два условия:
Первый элемент выравнивается относительно верхней границы контейнера (
app:layout_constraintTop_toTopOf="parent"), последний элемент выравнивается относительно нижней границы контейнера (app:layout_constraintBottom_toBottomOf="parent").Благодаря установке атрибутов
app:layout_constraintBottom_toTopOfиapp:layout_constraintBottom_toTopOfрасполагаем один элемент поверх другого.
Чтобы настроить положение элементов внутри цепочки, применяется атрибут layout_constraintVertical_chainStyle, который может принимать следующие значения:
spread: значение по умолчанию, при котором элементы цепочки равномерно растягиваются по всей длине цепочки
spread_inside: первый и последний элемент цепочки примыкают к границами контейнера
packed: элементы цепочки прилегают вплотную друг к другу.
Например, вертикальная цепочка со значением по умолчанию - spread:
<?xml version="1.0" encoding="utf-8"?>
<androidx.constraintlayout.widget.ConstraintLayout xmlns:android="http://schemas.android.com/apk/res/android"
    xmlns:app="http://schemas.android.com/apk/res-auto"
    xmlns:tools="http://schemas.android.com/tools"
    android:layout_width="match_parent"
    android:layout_height="match_parent"
    tools:context=".MainActivity">

    <TextView
        android:id="@+id/textView1"
        android:layout_width="200dp"
        android:layout_height="wrap_content"
        android:background="#efefef"
        android:text="First"
        android:textSize="30sp"
        app:layout_constraintBottom_toTopOf="@id/textView2"
        app:layout_constraintLeft_toLeftOf="parent"
        app:layout_constraintRight_toRightOf="parent"
        app:layout_constraintTop_toTopOf="parent" />

    <TextView
        android:id="@+id/textView2"
        android:layout_width="200dp"
        android:layout_height="wrap_content"
        android:background="#e0e0e0"
        android:text="Second"
        android:textSize="30sp"
        app:layout_constraintTop_toBottomOf="@id/textView1"
        app:layout_constraintBottom_toTopOf="@id/textView3"
        app:layout_constraintLeft_toLeftOf="parent"
        app:layout_constraintRight_toRightOf="parent" />

    <TextView
        android:id="@+id/textView3"
        android:layout_width="200dp"
        android:layout_height="wrap_content"
        android:background="#efefef"
        android:text="Third"
        android:textSize="30sp"

        app:layout_constraintTop_toBottomOf="@id/textView2"
        app:layout_constraintLeft_toLeftOf="parent"
        app:layout_constraintRight_toRightOf="parent"
        app:layout_constraintBottom_toBottomOf="parent" />

</androidx.constraintlayout.widget.ConstraintLayout>
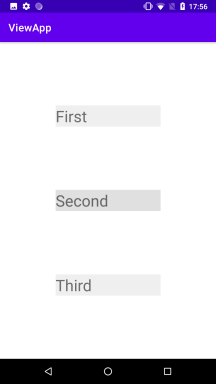
Также достаточно применить к первому элементу цепочки атрибут layout_constraintVertical_chainStyle, чтобы изменить положение элементов:
<TextView
        android:id="@+id/textView1"
        android:layout_width="200dp"
        android:layout_height="wrap_content"
        android:background="#efefef"
        android:text="First"
        android:textSize="30sp"

		app:layout_constraintVertical_chainStyle="spread_inside"

        app:layout_constraintBottom_toTopOf="@id/textView2"
        app:layout_constraintLeft_toLeftOf="parent"
        app:layout_constraintRight_toRightOf="parent"
        app:layout_constraintTop_toTopOf="parent" />

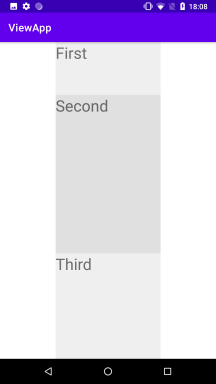
И как при горизонтальной ориентации в вертикальной цепочки можно использовать вес элементов с помощью атрибута layout_constraintVertical_weight. Для установки веса у элемента в качестве высоты должно быть установлено значение 0dp
<?xml version="1.0" encoding="utf-8"?>
<androidx.constraintlayout.widget.ConstraintLayout xmlns:android="http://schemas.android.com/apk/res/android"
    xmlns:app="http://schemas.android.com/apk/res-auto"
    xmlns:tools="http://schemas.android.com/tools"
    android:layout_width="match_parent"
    android:layout_height="match_parent"
    tools:context=".MainActivity">

    <TextView
        android:id="@+id/textView1"
        android:layout_width="200dp"
        android:layout_height="0dp"
        android:background="#efefef"
        android:text="First"
        android:textSize="30sp"
        app:layout_constraintVertical_weight="1"
        app:layout_constraintBottom_toTopOf="@id/textView2"
        app:layout_constraintLeft_toLeftOf="parent"
        app:layout_constraintRight_toRightOf="parent"
        app:layout_constraintTop_toTopOf="parent" />

    <TextView
        android:id="@+id/textView2"
        android:layout_width="200dp"
        android:layout_height="0dp"
        android:background="#e0e0e0"
        android:text="Second"
        android:textSize="30sp"
        app:layout_constraintVertical_weight="3"
        app:layout_constraintTop_toBottomOf="@id/textView1"
        app:layout_constraintBottom_toTopOf="@id/textView3"
        app:layout_constraintLeft_toLeftOf="parent"
        app:layout_constraintRight_toRightOf="parent" />

    <TextView
        android:id="@+id/textView3"
        android:layout_width="200dp"
        android:layout_height="0dp"
        android:background="#efefef"
        android:text="Third"
        android:textSize="30sp"
        app:layout_constraintVertical_weight="2"
        app:layout_constraintTop_toBottomOf="@id/textView2"
        app:layout_constraintLeft_toLeftOf="parent"
        app:layout_constraintRight_toRightOf="parent"
        app:layout_constraintBottom_toBottomOf="parent" />

</androidx.constraintlayout.widget.ConstraintLayout>
Совокупный вес элементов в данном случае 1 + 3 + 2 = 6. Поэтому вся высота контейнера будет делиться на 6 частей, из которых первый элемент займет 1 часть, второй - 3 части и третий - 2 части в соответствии со своим весом.
- Глава 1. Начало работы с Android
- Глава 2. Основы создания интерфейса
- Создание интерфейса в коде java
- Определение интерфейса в файле XML. Файлы layout
- Определение размеров
- Ширина и высота элементов
- Внутренние и внешние отступы
- ConstraintLayout
- Размеры элементов в ConstraintLayout
- Цепочки элементов в ConstraintLayout
- Программное создание ConstraintLayout и позиционионирование
- LinearLayout
- RelativeLayout
- TableLayout
- FrameLayout
- GridLayout
- ScrollView
- Вложенные layout
- Gravity и позиционирование внутри элемента
- Глава 3. Основные элементы управления
- Глава 4. Ресурсы
- Глава 5. Activity
- Глава 6. Работа с изображениями
- Глава 7. Адаптеры и списки
- ListView и ArrayAdapter
- Ресурс string-array и ListView
- Выбор элемента в ListView
- Добавление и удаление в ArrayAdapter и ListView
- Расширение списков и создание адаптера
- Оптимизация адаптера и View Holder
- Сложный список с кнопками
- Выпадающий список Spinner
- Виджет автодополнения AutoCompleteTextView
- GridView
- RecyclerView
- Обработка выбора элемента в RecyclerView
- Глава 8. Стили и темы
- Глава 9. Меню
- Глава 10. Фрагменты
- Глава 11. Многопоточность
- Глава 12. Работа с сетью. WebView
- Глава 13. Работа с мультимедиа
- Глава 14. Настройки и состояние приложения
- Глава 15. Работа с файловой системой
- Глава 16. Работа с базами данных SQLite
- Глава 17. Перелистывание страниц и ViewPager2
- Глава 18. Сервисы
- Глава 19. Диалоговые окна
- Глава 20. Анимация
- Глава 21. Провайдеры контента
- Глава 22. JSON
- Глава 23. Работа с XML