Создание текстурированного куба
Если бы все 3D в Silverlight 5 ограничивалось бы треугольниками, то не было бы смысла всем этим заниматься. Однако с помощью примитивов мы можем складывать более сложные элементы, например, из двух треугольников уже можно сделать прямоугольник, а из шесть прямоугольников составляют шесть сторон куба - трехмерной фигуры.
Для создания куба возьмем за основу наше предыдущее приложение. По сути нам надо произвести всего два изменения: увеличить число вершин до 36 (так как для создания шести сторон нам потребуется 12 треугольников по три вершины на каждый) и увеличить число отображаемых примитивов до 12.
Код XAML у нас останется по сути тем же самым:
<UserControl x:Class="_3DCube.MainPage"
    xmlns="http://schemas.microsoft.com/winfx/2006/xaml/presentation"
    xmlns:x="http://schemas.microsoft.com/winfx/2006/xaml"
    xmlns:d="http://schemas.microsoft.com/expression/blend/2008"
    xmlns:mc="http://schemas.openxmlformats.org/markup-compatibility/2006"
    mc:Ignorable="d"
    d:DesignHeight="300" d:DesignWidth="400" KeyDown="UserControl_KeyDown">

    <Grid x:Name="LayoutRoot" Background="White">
        <DrawingSurface Width="400" Height="300" Draw="DrawingSurface_Draw"   />
    </Grid>
</UserControl>
А файл кода c# будет выглядеть следующим образом:
using System;
using System.Windows;
using System.Windows.Controls;
using System.Windows.Input;
using System.Windows.Shapes;
using System.Windows.Graphics;
using Microsoft.Xna.Framework;
using Microsoft.Xna.Framework.Graphics;

namespace _3DCube
{
    public partial class MainPage : UserControl
    {
        VertexBuffer vertexBuffer;
        BasicEffect basicEffect;
        GraphicsDevice graphicDevice;
        float angle=0;
        public MainPage()
        {
            InitializeComponent();

            //Инициализация графического устройства текущим устройством
            graphicDevice = GraphicsDeviceManager.Current.GraphicsDevice;

            // Создание эффекта на основе класса BasicEffect
            basicEffect = new BasicEffect(graphicDevice);

            // Включаем отрисовку цветовой гаммы вершин
            basicEffect.VertexColorEnabled = true;
            // Массив вершин
            VertexPositionColor[] vertices = new VertexPositionColor[36];

            Color colorRed = new Color(255, 0, 0);
            Color colorBlue = new Color(0, 255, 0);
            Color colorGreen = new Color(0, 0, 255);

            Vector3 topLeft = new Vector3(-1, 1, 0);
            Vector3 bottomLeft = new Vector3(-1, -1, 0);
            Vector3 topRight = new Vector3(1, 1, 0);
            Vector3 bottomRight = new Vector3(1, -1, 0);
            Vector3 topLeftFront = new Vector3(-1, 1, 1);
            Vector3 bottomLeftFront = new Vector3(-1, -1, 1);
            Vector3 topRightFront = new Vector3(1, 1, 1);
            Vector3 bottomRightFront = new Vector3(1, -1, 1);
            Vector3 topLeftBack = new Vector3(-1, 1, -1);
            Vector3 topRightBack = new Vector3(1, 1, -1);
            Vector3 bottomLeftBack = new Vector3(-1, -1, -1);
            Vector3 bottomRightBack = new Vector3(1, -1, -1);

            // Лицевая сторона
            vertices[0] = new VertexPositionColor(topRightFront, colorBlue);
            vertices[1] = new VertexPositionColor(bottomLeftFront, colorRed);
            vertices[2] = new VertexPositionColor(topLeftFront, colorGreen);
            vertices[3] = new VertexPositionColor(topRightFront, colorBlue);
            vertices[4] = new VertexPositionColor(bottomRightFront, colorGreen);
            vertices[5] = new VertexPositionColor(bottomLeftFront, colorRed);

            // Задняя сторона
            vertices[6] = new VertexPositionColor(bottomLeftBack, colorBlue);
            vertices[7] = new VertexPositionColor(topRightBack, colorRed);
            vertices[8] = new VertexPositionColor(topLeftBack, colorGreen);
            vertices[9] = new VertexPositionColor(bottomRightBack, colorGreen);
            vertices[10] = new VertexPositionColor(topRightBack, colorRed);
            vertices[11] = new VertexPositionColor(bottomLeftBack, colorBlue);

            // Верх
            vertices[12] = new VertexPositionColor(topLeftBack, colorBlue);
            vertices[13] = new VertexPositionColor(topRightBack, colorRed);
            vertices[14] = new VertexPositionColor(topLeftFront, colorGreen);
            vertices[15] = new VertexPositionColor(topRightBack, colorRed);
            vertices[16] = new VertexPositionColor(topRightFront, colorBlue);
            vertices[17] = new VertexPositionColor(topLeftFront, colorGreen);

            // Низ
            vertices[18] = new VertexPositionColor(bottomRightBack, colorBlue);
            vertices[19] = new VertexPositionColor(bottomLeftBack, colorRed);
            vertices[20] = new VertexPositionColor(bottomLeftFront, colorGreen);
            vertices[21] = new VertexPositionColor(bottomRightFront, colorRed);
            vertices[22] = new VertexPositionColor(bottomRightBack, colorBlue);
            vertices[23] = new VertexPositionColor(bottomLeftFront, colorGreen);

            // Левая сторона
            vertices[24] = new VertexPositionColor(bottomLeftFront, colorBlue);
            vertices[25] = new VertexPositionColor(bottomLeftBack, colorRed);
            vertices[26] = new VertexPositionColor(topLeftFront, colorGreen);
            vertices[27] = new VertexPositionColor(topLeftFront, colorGreen);
            vertices[28] = new VertexPositionColor(bottomLeftBack, colorRed);
            vertices[29] = new VertexPositionColor(topLeftBack, colorBlue);

            // Правая сторона
            vertices[30] = new VertexPositionColor(bottomRightBack, colorBlue);
            vertices[31] = new VertexPositionColor(bottomRightFront, colorRed);
            vertices[32] = new VertexPositionColor(topRightFront, colorGreen);
            vertices[33] = new VertexPositionColor(bottomRightBack, colorBlue);
            vertices[34] = new VertexPositionColor(topRightFront, colorGreen);
            vertices[35] = new VertexPositionColor(topRightBack, colorRed);

            // Создаем буфер вершин
            vertexBuffer = new VertexBuffer(graphicDevice, VertexPositionColor.VertexDeclaration,
                vertices.Length, BufferUsage.WriteOnly);
            // Устанавливаем буфер вершин на основе массива вершин
            vertexBuffer.SetData(0, vertices, 0, vertices.Length, 0);
        }

        private void DrawingSurface_Draw(object sender, DrawEventArgs e)
        {
            basicEffect.World = Matrix.CreateRotationY(angle); ;
            basicEffect.View = Matrix.CreateLookAt(new Vector3(0, 0f, 5.0f),
                          Vector3.Zero, Vector3.Up);
            basicEffect.Projection = Matrix.CreatePerspectiveFieldOfView
                          (MathHelper.PiOver4, 1f, 0.01f, 1000.0f);
            // Очищаем графическое устройство
            graphicDevice.Clear(new Color(0.8f, 0.8f, 0.8f, 1.0f));
            // Устанавливаем на устройстве буфер вершин
            graphicDevice.SetVertexBuffer(vertexBuffer);
            // Выполняем проходы эффекта
            foreach (EffectPass pass in basicEffect.CurrentTechnique.Passes)
            {
                pass.Apply();
                // Отрисовка графики
                graphicDevice.DrawPrimitives(PrimitiveType.TriangleList,
                  0, 12);
            }
            // Уведомляем систему о том, что можно сново вызывать событие Draw
            e.InvalidateSurface();
        }

        private void UserControl_KeyDown(object sender, KeyEventArgs e)
        {
            if (e.Key == Key.Left)
            {
                angle += 0.5f;
            }
            else if (e.Key == Key.Right)
            {
                angle -= 0.5f;
            }
        }
    }
}
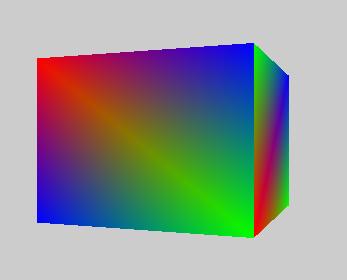
Запустим приложение и увидим наш куб в действии:
Текстурирование куба
Внесем в код ряд изменнеий. Во-первых, добавим в конструктор окна код загрузки текстуры:
// Загрузка текстуры из ресурса в BitmapImage.
            Stream s = Application.GetResourceStream(new Uri(@"3DCube;component/bronz.jpg", UriKind.Relative)).Stream;

            BitmapImage bmp = new BitmapImage();
            bmp.SetSource(s);

            // Копируем данные из BitmapImage в объект Texture2D
            Texture2D texture;
            texture = new Texture2D(graphicDevice, bmp.PixelWidth, bmp.PixelHeight);
            bmp.CopyTo(texture);

            // Установка текстуры
            basicEffect.Texture = texture;
Здесь мы загружаем в поток из ресурсов наше изображение (в данном случае файл bronz.jpg) и создаем объект BitmapImage из этого потока. Затем копируем данные из BitmapImage в текстуру, представленную классом Texture2D. В конце устанавливаем текстуру для нашего эффекта.
Поскольку вместо обычных цветовых точек мы будем использовать текстуру, то заменим строку
basicEffect.VertexColorEnabled = true;
на
basicEffect.TextureEnabled = true;
Далее опять же нам больше не потребуется тип VertexPositionColor, так как для позиционирования текстуры и создания текстурированных элементов мы будем использовать тип VertexPositionTexture, поэтому блок создания вершин и установки вершинного буфера будет выглядеть следующим образом:
// Массив вершин
VertexPositionTexture[] vertices = new VertexPositionTexture[36];
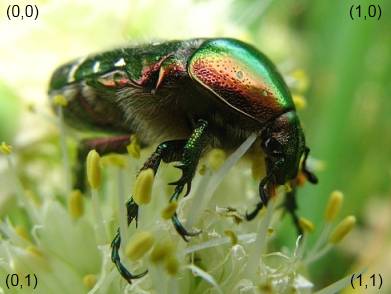
Vector2 textureTopLeft = new Vector2(0, 0);
Vector2 textureTopRight = new Vector2(1, 0);
Vector2 textureBottomLeft = new Vector2(0, 1);
Vector2 textureBottomRight = new Vector2(1, 1);
Vector3 topLeft = new Vector3(-1, 1, 0);
Vector3 bottomLeft = new Vector3(-1, -1, 0);
Vector3 topRight = new Vector3(1, 1, 0);
Vector3 bottomRight = new Vector3(1, -1, 0);
Vector3 topLeftFront = new Vector3(-1, 1, 1);
Vector3 bottomLeftFront = new Vector3(-1, -1, 1);
Vector3 topRightFront = new Vector3(1, 1, 1);
Vector3 bottomRightFront = new Vector3(1, -1, 1);
Vector3 topLeftBack = new Vector3(-1, 1, -1);
Vector3 topRightBack = new Vector3(1, 1, -1);
Vector3 bottomLeftBack = new Vector3(-1, -1, -1);
Vector3 bottomRightBack = new Vector3(1, -1, -1);
// Лицевая сторона
vertices[0] = new VertexPositionTexture(topRightFront, textureTopRight);
vertices[1] = new VertexPositionTexture(bottomLeftFront, textureBottomLeft);
vertices[2] = new VertexPositionTexture(topLeftFront, textureTopLeft);
vertices[3] = new VertexPositionTexture(topRightFront, textureTopRight);
vertices[4] = new VertexPositionTexture(bottomRightFront, textureBottomRight);
vertices[5] = new VertexPositionTexture(bottomLeftFront, textureBottomLeft);
// Задняя сторона
vertices[6] = new VertexPositionTexture(bottomLeftBack, textureBottomLeft);
vertices[7] = new VertexPositionTexture(topRightBack, textureTopRight);
vertices[8] = new VertexPositionTexture(topLeftBack, textureTopLeft);
vertices[9] = new VertexPositionTexture(bottomRightBack, textureBottomRight);
vertices[10] = new VertexPositionTexture(topRightBack, textureTopRight);
vertices[11] = new VertexPositionTexture(bottomLeftBack, textureBottomLeft);
// Верх
vertices[12] = new VertexPositionTexture(topLeftBack, textureTopLeft);
vertices[13] = new VertexPositionTexture(topRightBack, textureTopRight);
vertices[14] = new VertexPositionTexture(topLeftFront, textureBottomLeft);
vertices[15] = new VertexPositionTexture(topRightBack, textureTopRight);
vertices[16] = new VertexPositionTexture(topRightFront, textureBottomRight);
vertices[17] = new VertexPositionTexture(topLeftFront, textureBottomLeft);
// Низ
vertices[18] = new VertexPositionTexture(bottomRightBack, textureBottomRight);
vertices[19] = new VertexPositionTexture(bottomLeftBack, textureBottomLeft);
vertices[20] = new VertexPositionTexture(bottomLeftFront, textureTopLeft);
vertices[21] = new VertexPositionTexture(bottomRightFront, textureTopRight);
vertices[22] = new VertexPositionTexture(bottomRightBack, textureBottomRight);
vertices[23] = new VertexPositionTexture(bottomLeftFront, textureTopLeft);
// Левая сторона
vertices[24] = new VertexPositionTexture(bottomLeftFront, textureBottomRight);
vertices[25] = new VertexPositionTexture(bottomLeftBack, textureBottomLeft);
vertices[26] = new VertexPositionTexture(topLeftFront, textureTopRight);
vertices[27] = new VertexPositionTexture(topLeftFront, textureTopRight);
vertices[28] = new VertexPositionTexture(bottomLeftBack, textureBottomLeft);
vertices[29] = new VertexPositionTexture(topLeftBack, textureTopLeft);
// Правая сторона
vertices[30] = new VertexPositionTexture(bottomRightBack, textureBottomRight);
vertices[31] = new VertexPositionTexture(bottomRightFront, textureBottomLeft);
vertices[32] = new VertexPositionTexture(topRightFront, textureTopLeft);
vertices[33] = new VertexPositionTexture(bottomRightBack, textureBottomRight);
vertices[34] = new VertexPositionTexture(topRightFront, textureTopLeft);
vertices[35] = new VertexPositionTexture(topRightBack, textureTopRight);
// Создаем буфер вершин
vertexBuffer = new VertexBuffer(graphicDevice, VertexPositionTexture.VertexDeclaration,
vertices.Length, BufferUsage.WriteOnly);
// Устанавливаем буфер вершин на основе массива вершин
vertexBuffer.SetData(0, vertices, 0, vertices.Length, 0);
Использованные нами объекты типа VertexPositionTexture имеют два параметра, Первый - координаты вершины в пространстве. Второй представляет координаты на текстуре, которые накладываются на точку пространства. Причем координаты текстуры изменяются от 0 до 1. Точка с координатами (0.5, 0.5) находится в центре текстуры.
private void DrawingSurface_Draw(object sender, DrawEventArgs e)
        {
            basicEffect.World = Matrix.CreateRotationY(angle);
            basicEffect.View = Matrix.CreateLookAt(new Vector3(0, 0f, 5.0f),
                          Vector3.Zero, Vector3.Up);
            basicEffect.Projection = Matrix.CreatePerspectiveFieldOfView
                          (MathHelper.PiOver4, 1f, 0.01f, 1000.0f);
            graphicDevice.SamplerStates[0] = SamplerState.LinearClamp;
            // Очищаем графическое устройство
            graphicDevice.Clear(new Color(0.8f, 0.8f, 0.8f, 1.0f));
            // Устанавливаем на устройстве буфер вершин
            graphicDevice.SetVertexBuffer(vertexBuffer);
            // Выполняем проходы эффекта
            foreach (EffectPass pass in basicEffect.CurrentTechnique.Passes)
            {
                pass.Apply();
                // Отрисовка графики
                graphicDevice.DrawPrimitives(PrimitiveType.TriangleList,
                  0, 12);
            }
            // Уведомляем систему о том, что можно сново вызывать событие Draw
            e.InvalidateSurface();
        }
Здесь опять же все то же самое, что и было в образце с цветным кубом, за исключением одной строки: graphicDevice.SamplerStates[0] = SamplerState.LinearClamp;,
в которой определяется метод отбора значений текстуры для их последующего сопоставления с поверхностью трехмерного объекта.
Теперь мы можем перестроить проект и запустить тестовую страницу в браузере:
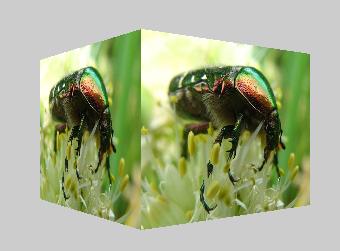
Таким образом мы можем выполнить текстурирование трехмерного объекта и обработать пользовательский ввод по отношению к данному объекту.
- Глава 1. Введение в Silverlight
- Глава 2. XAML в Silverlight
- Глава 3. Компоновка
- Глава 4. Элементы управления
- Глава 5. Приложение и класс Application
- Глава 6. Кисти и эффекты
- Глава 7. Ресурсы
- Глава 8. Стили
- Глава 9. Привязка
- Глава 10. Шаблоны элементов управления
- Глава 11. Анимации и трансформации
- Глава 12. Двухмерная графика
- Глава 13. Работа с мультимедиа
- Глава 14. Трехмерная графика