Сложный список с кнопками
Ранее были расмотрены кастомные адаптеры, которые позволяют выводить в списки сложные данные. Теперь пойдем дальше и рассмотрим, как мы можем добавить в списки другие элементы, например, кнопки, и обрабатывать их события.
Для этого вначале определим следующий класс Product:
package com.example.listapp;

public class Product {
    private final String name;
    private int count;
    private final String unit;

    Product(String name, String unit){
        this.name = name;
        this.count=0;
        this.unit = unit;
    }
    public String getUnit() {
        return this.unit;
    }
    public void setCount(int count) {
        this.count = count;
    }

    public int getCount() {
        return count;
    }
    public String getName(){
        return this.name;
    }
}
Данный класс хранит название, количество продукта, а также единицу измерения. И объекты этого классы будем выводить в список.
Для этого в папку res/layout добавим новый файл list_item.xml:
<?xml version="1.0" encoding="utf-8"?>
<androidx.constraintlayout.widget.ConstraintLayout
    xmlns:android="http://schemas.android.com/apk/res/android"
    xmlns:app="http://schemas.android.com/apk/res-auto"
    android:layout_width="match_parent"
    android:layout_height="wrap_content"
	android:padding="16dp" >

    <TextView
        android:id="@+id/nameView"
        android:layout_width="0dp"
        android:layout_height="wrap_content"
        android:textSize="18sp"
        app:layout_constraintHorizontal_weight="2"
        app:layout_constraintBottom_toBottomOf="parent"
        app:layout_constraintLeft_toLeftOf="parent"
        app:layout_constraintRight_toLeftOf="@+id/countView"
        app:layout_constraintTop_toTopOf="parent"/>
    <TextView
        android:id="@+id/countView"
        android:layout_width="0dp"
        android:layout_height="wrap_content"
        android:textSize="18sp"
        app:layout_constraintHorizontal_weight="2"
        app:layout_constraintBottom_toBottomOf="parent"
        app:layout_constraintLeft_toRightOf="@+id/nameView"
        app:layout_constraintRight_toLeftOf="@+id/addButton"
        app:layout_constraintTop_toTopOf="parent" />
    <Button
        android:id="@+id/addButton"
        android:layout_width="0dp"
        android:layout_height="wrap_content"
        android:text="+"
        app:layout_constraintHorizontal_weight="1"
        app:layout_constraintBottom_toBottomOf="parent"
        app:layout_constraintLeft_toRightOf="@+id/countView"
        app:layout_constraintRight_toLeftOf="@+id/removeButton"
        app:layout_constraintTop_toTopOf="parent" />
    <Button
        android:id="@+id/removeButton"
        android:layout_width="0dp"
        android:layout_height="wrap_content"
        android:text="-"
        app:layout_constraintHorizontal_weight="1"
        app:layout_constraintBottom_toBottomOf="parent"
        app:layout_constraintLeft_toRightOf="@+id/addButton"
        app:layout_constraintRight_toRightOf="parent"
        app:layout_constraintTop_toTopOf="parent"/>

</androidx.constraintlayout.widget.ConstraintLayout>
Здесь определены два текстовых поля для вывода названия и количества продукта и две кнопки для добавления и удаления однйо единицы продукта.
Теперь добавим класс адаптера, который назовем ProductAdapter:
package com.example.listapp;

import android.content.Context;
import android.view.LayoutInflater;
import android.view.View;
import android.view.ViewGroup;
import android.widget.ArrayAdapter;
import android.widget.Button;
import android.widget.TextView;

import java.util.ArrayList;

class ProductAdapter extends ArrayAdapter<Product> {
    private final LayoutInflater inflater;
    private final int layout;
    private final ArrayList<Product> productList;

    ProductAdapter(Context context, int resource, ArrayList<Product> products) {
        super(context, resource, products);
        this.productList = products;
        this.layout = resource;
        this.inflater = LayoutInflater.from(context);
    }
    public View getView(int position, View convertView, ViewGroup parent) {

        final ViewHolder viewHolder;
        if(convertView==null){
            convertView = inflater.inflate(this.layout, parent, false);
            viewHolder = new ViewHolder(convertView);
            convertView.setTag(viewHolder);
        }
        else{
            viewHolder = (ViewHolder) convertView.getTag();
        }
        final Product product = productList.get(position);

        viewHolder.nameView.setText(product.getName());
        viewHolder.countView.setText(product.getCount() + " " + product.getUnit());

        viewHolder.removeButton.setOnClickListener(new View.OnClickListener() {
            @Override
            public void onClick(View v) {
                int count = product.getCount()-1;
                if(count<0) count=0;
                product.setCount(count);
                viewHolder.countView.setText(count + " " + product.getUnit());
            }
        });
        viewHolder.addButton.setOnClickListener(new View.OnClickListener() {
            @Override
            public void onClick(View v) {
                int count = product.getCount()+1;
                product.setCount(count);
                viewHolder.countView.setText(count + " " + product.getUnit());
            }
        });

        return convertView;
    }
    private static class ViewHolder {
        final Button addButton, removeButton;
        final TextView nameView, countView;
        ViewHolder(View view){
            addButton = view.findViewById(R.id.addButton);
            removeButton = view.findViewById(R.id.removeButton);
            nameView = view.findViewById(R.id.nameView);
            countView = view.findViewById(R.id.countView);
        }
    }
}
Для каждой кнопки здесь определен обработчик нажатия, в котором мы уменьшаем, либо увеличиваем количество продукта на единицу и затем переустанавливаем текст в сооветствующем текстовом поле.
Далее в файле activity_main.xml определим элемент ListView:
<?xml version="1.0" encoding="utf-8"?>
<androidx.constraintlayout.widget.ConstraintLayout
    xmlns:android="http://schemas.android.com/apk/res/android"
    xmlns:app="http://schemas.android.com/apk/res-auto"
    android:layout_width="match_parent"
    android:layout_height="match_parent">
    <ListView
        android:id="@+id/productList"
        android:layout_width="0dp"
        android:layout_height="0dp"
        app:layout_constraintBottom_toBottomOf="parent"
        app:layout_constraintLeft_toLeftOf="parent"
        app:layout_constraintRight_toRightOf="parent"
        app:layout_constraintTop_toTopOf="parent" />

</androidx.constraintlayout.widget.ConstraintLayout>
И изменим класс MainActivity:
package com.example.listapp;

import androidx.appcompat.app.AppCompatActivity;
import android.os.Bundle;
import android.widget.ListView;
import java.util.ArrayList;

public class MainActivity extends AppCompatActivity {

    @Override
    protected void onCreate(Bundle savedInstanceState) {
        super.onCreate(savedInstanceState);
        setContentView(R.layout.activity_main);

        ArrayList<Product> products = new ArrayList<Product>();
        products.add(new Product("Картофель", "кг."));
        products.add(new Product("Чай", "шт."));
        products.add(new Product("Яйца", "шт."));
        products.add(new Product("Молоко", "л."));
        products.add(new Product("Макароны", "кг."));
        ListView productList = findViewById(R.id.productList);
        ProductAdapter adapter = new ProductAdapter(this, R.layout.list_item, products);
        productList.setAdapter(adapter);
    }
}
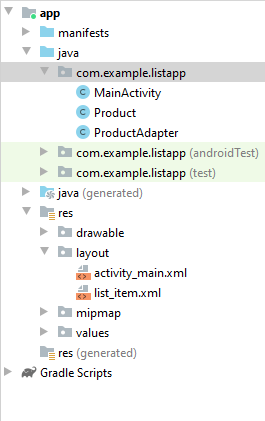
В итоге получится следующий проект:
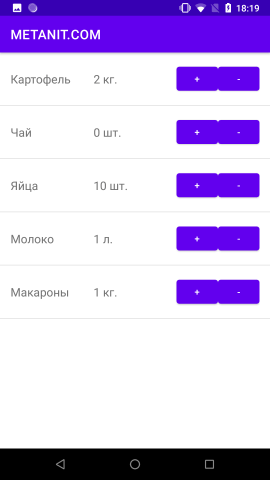
И после запуска приложения мы сможем управлять количеством продуктов через кнопки:
- Глава 1. Начало работы с Android
- Глава 2. Основы создания интерфейса
- Создание интерфейса в коде java
- Определение интерфейса в файле XML. Файлы layout
- Определение размеров
- Ширина и высота элементов
- Внутренние и внешние отступы
- ConstraintLayout
- Размеры элементов в ConstraintLayout
- Цепочки элементов в ConstraintLayout
- Программное создание ConstraintLayout и позиционионирование
- LinearLayout
- RelativeLayout
- TableLayout
- FrameLayout
- GridLayout
- ScrollView
- Вложенные layout
- Gravity и позиционирование внутри элемента
- Глава 3. Основные элементы управления
- Глава 4. Ресурсы
- Глава 5. Activity
- Глава 6. Работа с изображениями
- Глава 7. Адаптеры и списки
- ListView и ArrayAdapter
- Ресурс string-array и ListView
- Выбор элемента в ListView
- Добавление и удаление в ArrayAdapter и ListView
- Расширение списков и создание адаптера
- Оптимизация адаптера и View Holder
- Сложный список с кнопками
- Выпадающий список Spinner
- Виджет автодополнения AutoCompleteTextView
- GridView
- RecyclerView
- Обработка выбора элемента в RecyclerView
- Глава 8. Стили и темы
- Глава 9. Меню
- Глава 10. Фрагменты
- Глава 11. Многопоточность
- Глава 12. Работа с сетью. WebView
- Глава 13. Работа с мультимедиа
- Глава 14. Настройки и состояние приложения
- Глава 15. Работа с файловой системой
- Глава 16. Работа с базами данных SQLite
- Глава 17. Перелистывание страниц и ViewPager2
- Глава 18. Сервисы
- Глава 19. Диалоговые окна
- Глава 20. Анимация
- Глава 21. Провайдеры контента
- Глава 22. JSON
- Глава 23. Работа с XML