Добавление свойств
В прошлой теме был создан новый элемент HeaderView. Но на данный момент он выглядит слишком просто:
public class HeaderView : View
{}
В нем пока нет никакой функциональности. Теперь изменим его, добавив пару свойств:
using Xamarin.Forms;

namespace HelloApp
{
    public class HeaderView : View
    {
        public static readonly BindableProperty TextProperty =
            BindableProperty.Create("Text", typeof(string), typeof(HeaderView), string.Empty);
        public string Text
        {
            set
            {
                SetValue(TextProperty, value);
            }
            get
            {
                return (string)GetValue(TextProperty);
            }
        }

        public static readonly BindableProperty TextColorProperty =
            BindableProperty.Create("TextColor", typeof(Color), typeof(HeaderView), Color.Default);
        public Color TextColor
        {
            set
            {
                SetValue(TextColorProperty, value);
            }
            get
            {
                return (Color)GetValue(TextColorProperty);
            }
        }
    }
}
Класс определяет два свойства: Text и TextColor. Фактически данные свойства выступают в качестве обертки над BindableProperty. Тем самым мы сможем использовать свойства в механизме привязки.
На странице определим пару элементов HeaderView:
<?xml version="1.0" encoding="utf-8" ?>
<ContentPage xmlns="http://xamarin.com/schemas/2014/forms"
xmlns:x="http://schemas.microsoft.com/winfx/2009/xaml"
xmlns:local="clr-namespace:HelloApp;assembly=HelloApp"
x:Class="HelloApp.MainPage">
<StackLayout>
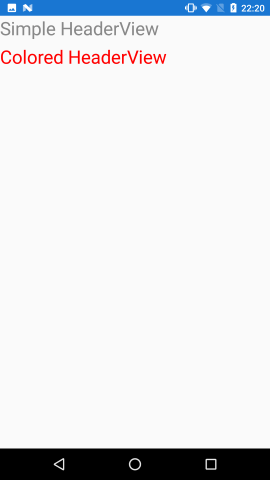
<local:HeaderView Text="Simple HeaderView"></local:HeaderView>
<local:HeaderView Text="Colored HeaderView" TextColor="Red"></local:HeaderView>
</StackLayout>
</ContentPage>
Затем нам надо изменить код рендереров для каждой платформы, чтобы через свойства в HeaderView можно было установить параметры визуализации.
Изменим код рендерера для Android следующим образом:
using Android.Content;
using Android.Util;
using Android.Widget;
using HelloApp;
using HelloApp.Droid;
using System.ComponentModel;
using Xamarin.Forms;
using Xamarin.Forms.Platform.Android;

[assembly: ExportRenderer(typeof(HeaderView), typeof(HeaderViewRenderer))]
namespace HelloApp.Droid
{
    public class HeaderViewRenderer : ViewRenderer<HeaderView, TextView>
    {
		public HeaderViewRenderer(Context context) : base(context)
        {
        }
        protected override void OnElementChanged(ElementChangedEventArgs<HeaderView> args)
        {
            base.OnElementChanged(args);
            if (Control == null)
            {
                // создаем и настраиваем элемент
                TextView textView = new TextView(Context);
                textView.SetTextSize(ComplexUnitType.Dip, 28);

                // устанавливаем элемент для класса из Portable-проекта
                SetNativeControl(textView);
                // установка свойств
                if (args.NewElement != null)
                {
                    SetText();
                    SetTextColor();
                }
            }
        }
        // изменения свойства
        protected override void OnElementPropertyChanged(object sender, PropertyChangedEventArgs e)
        {
            base.OnElementPropertyChanged(sender, e);

            if (e.PropertyName == HeaderView.TextColorProperty.PropertyName)
            {
                SetTextColor();
            }
            else if (e.PropertyName == HeaderView.TextProperty.PropertyName)
            {
                SetText();
            }
        }
        private void SetText()
        {
            Control.Text = Element.Text;
        }
        private void SetTextColor()
        {
            Android.Graphics.Color andrColor = Android.Graphics.Color.Gray;

            if (Element.TextColor != Xamarin.Forms.Color.Default)
            {
                Xamarin.Forms.Color color = Element.TextColor;
                andrColor = Android.Graphics.Color.Argb(
                    (byte)(color.A * 255),
                    (byte)(color.R * 255),
                    (byte)(color.G * 255),
                    (byte)(color.B * 255));
            }
            Control.SetTextColor(andrColor);
        }
    }
}
Во время вызова метода OnElementChanged() ожидается, что объект из Xamarin.Forms (в нашем случае HeaderView) уже создан, а его свойства установлены.
Хотя как правило так и происходит, но это не обязательно должно происходить. С помощью передаваемого в качестве параметра объект ElementChangedEventArgs мы можем
получить тот элемент Xamarin.Forms, для которого создается нативный объект TextView. Если свойство NewElement не равно значению null,
то значит объект HeaderView создан, а его свойства установлены. В этом случае свойство
Element из ViewRenderer ссылается на тот же объект, что и NewElement. И мы можем передать значения его свойств в создаваемый нативный объект.
Для установки значений здесь используются два дополнительных метода SetText() и SetTextColor().
При использовании свойств важно, чтобы при изменении их значений у объекта Xamarin Forms автоматически менялись также и значения свойств нативного объекта.
Если свойство элемента из Xamarin.Forms представляет BindableProperty, то любое его изменение вызовет событие PropertyChanged. Поэтому
рендерер также будет уведомлен об изменении, и в этом случае у ViewRenderer будет вызван метод OnElementPropertyChanged().
В методе OnElementPropertyChanged() с помощью передаваемого параметра PropertyChangedEventArgs мы можем получить изменяемое свойство:
if (e.PropertyName == HeaderView.TextColorProperty.PropertyName)
{
    //.............
}
Если мы запустим приложение, то к обоим элементам HeaderView будут применены те свойства, которые мы для них указали:
Далее изменим реализацию рендерера в проекте для iOS:
using Xamarin.Forms;
using Xamarin.Forms.Platform.iOS;
using UIKit;
using HelloApp;
using HelloApp.iOS;
using System.ComponentModel;

[assembly: ExportRenderer(typeof(HeaderView), typeof(HeaderViewRenderer))]
namespace HelloApp.iOS
{
    public class HeaderViewRenderer : ViewRenderer<HeaderView, UILabel>
    {
        protected override void OnElementChanged(ElementChangedEventArgs<HeaderView> args)
        {
            base.OnElementChanged(args);
            if (Control == null)
            {
                UILabel uilabel = new UILabel
                {
                    Font = UIFont.SystemFontOfSize(25)
                };
                SetNativeControl(uilabel);

				if (args.NewElement != null)
				{
					SetText();
					SetTextColor();
				}
            }
        }
        protected override void OnElementPropertyChanged(object sender, PropertyChangedEventArgs e)
        {
            base.OnElementPropertyChanged(sender, e);

            if (e.PropertyName == HeaderView.TextColorProperty.PropertyName)
            {
                SetTextColor();
            }
            else if (e.PropertyName == HeaderView.TextProperty.PropertyName)
            {
                SetText();
            }
        }
        private void SetText()
        {
            Control.Text = Element.Text;
        }
        private void SetTextColor()
        {
            UIColor iosColor = UIColor.Gray;

            if (Element.TextColor != Xamarin.Forms.Color.Default)
            {
                Xamarin.Forms.Color color = Element.TextColor;
                iosColor = UIColor.FromRGBA(
                    (byte)(color.R * 255),
                    (byte)(color.G * 255),
                    (byte)(color.B * 255),
                    (byte)(color.A * 255));
            }
            Control.TextColor = iosColor;
        }
    }
}
Здесь аналогичный код, отличаются только конкретные классы, используемые при рендеринге.
И также изменим код рендерера для UWP:
using Xamarin.Forms.Platform.UWP;
using Windows.UI.Xaml.Controls;
using Windows.UI.Xaml.Media;
using HelloApp;
using HelloApp.UWP;
using System.ComponentModel;

[assembly: ExportRenderer(typeof(HeaderView), typeof(HeaderViewRenderer))]
namespace HelloApp.UWP
{
    public class HeaderViewRenderer : ViewRenderer<HeaderView, TextBlock>
    {
        protected override void OnElementChanged(ElementChangedEventArgs<HeaderView> args)
        {
            base.OnElementChanged(args);
            if (Control == null)
            {
                TextBlock textBlock = new TextBlock
                {
                    FontSize = 28
                };

                SetNativeControl(textBlock);
                if (args.NewElement != null)
                {
                    SetText();
                    SetTextColor();
                }
            }
        }

        protected override void OnElementPropertyChanged(object sender, PropertyChangedEventArgs e)
        {
            base.OnElementPropertyChanged(sender, e);
            if (e.PropertyName == HeaderView.TextColorProperty.PropertyName)
            {
                SetTextColor();
            }
            else if (e.PropertyName == HeaderView.TextProperty.PropertyName)
            {
                SetText();
            }
        }

        private void SetText()
        {
            Control.Text = Element.Text;
        }
        private void SetTextColor()
        {
            Windows.UI.Color winColor = Windows.UI.Colors.Black;

            if (Element.TextColor != Xamarin.Forms.Color.Default)
            {
                Xamarin.Forms.Color color = Element.TextColor;
                winColor = Windows.UI.Color.FromArgb(
                    (byte)(color.A * 255),
                    (byte)(color.R * 255),
                    (byte)(color.G * 255),
                    (byte)(color.B * 255));
            }
            Control.Foreground = new SolidColorBrush(winColor);
        }
    }
}
Таким образом, мы можем определить в кастомном элементе свойства и затем использовать их для рендеринга этого элемента.
- Глава 1. Xamarin и кросс-платформенная разработка
- Глава 2. Графический интерфейс в Xamarin Forms
- Глава 3. Контейнеры компоновки
- Глава 4. Элементы в Xamarin и их свойства
- Позиционирование элементов на странице
- Работа с цветом
- Стилизация текста
- Кнопки
- Текстовые поля
- Контейнер Frame
- BoxView
- Работа с изображениями. Элемент Image
- Выбор даты и времени. DatePicker и TimePicker
- Выпадающий список Picker
- Stepper и Slider
- Переключатель Switch
- TableView
- WebView
- Всплывающие окна
- Таймеры
- Глава 5. Платформо-зависимый код
- Глава 6. Ресурсы и стили
- Глава 7. Привязка в Xamarin
- Глава 8. ListView и работа с данными
- Глава 9. Навигация
- Глава 10. Типы страниц
- Глава 11. Хранение данных. Файлы
- Глава 12. MVVM
- Глава 13. Базы данных SQLite
- Глава 14. Глобализация и локализация
- Глава 15. Взаимодействие с сервером
- Глава 16. Визуальные компоненты ContentView
- Глава 17. Рендеринг элементов управления
- Глава 18. Работа с мультимедиа
- Глава 19. FlexLayout
- Глава 20. Realm
- Глава 21. Entity Framework Core
- Глава 22. Flyout